
Hello and welcome to this months Tech 4 Stampers Academy Blog Hop. This months theme is Sweet Treats and I just had to use the ‘Sweet Talk’ suite. This suite is adorable, great for valentines or that special someone, but also for birthdays and kids. I wanted to make a fun card, suitable for a BFF.
As a child I used to love Pop Up books and was amazed by the characters and images that seemed to jump out of the page. Today, I have recreated that joy in a card and hope that you too give it a go.
Sweet Treat Pop Up Card
Create an A6 card base, measuring 10.5cm x 14.9cm, from ‘Pool Party’ cardstock. Trim a piece of ‘Sweet Talk DSP’ (Designer Series Paper) to 9.5cm x 13.9cm and adhere to a ‘Blushing Bride’ cardstock layer, measuring 10cm x 14.4cm. Attach this to your card base using ‘Multipurpose Liquid Glue’.

Fussy cut three sweet packets and sweets from your DSP. You could choose lollipops or hearts, if preferred. Adhere to your card front using ‘Stampin’ Dimensionals’.
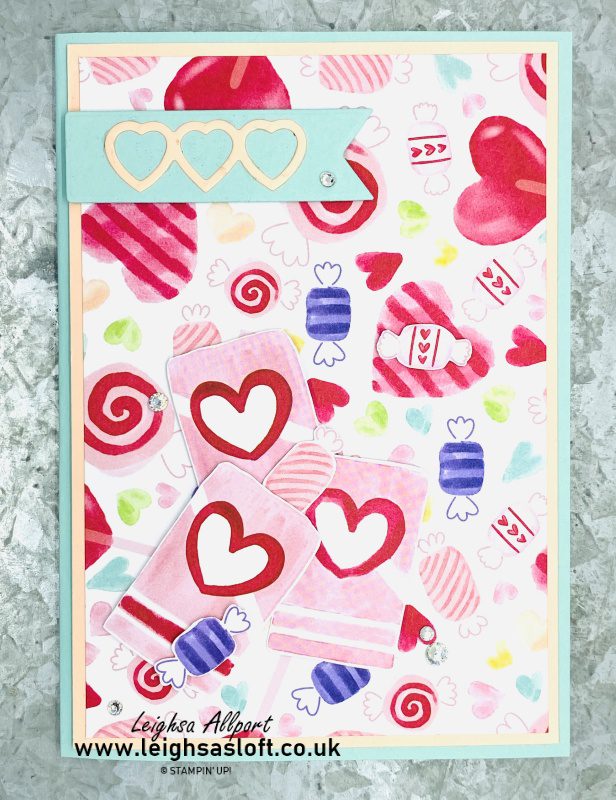
Die-cut a banner from ‘Pool Party’ cardstock and adhere to your card front using ‘Stampin Dimensionals’. Using the three hearts die, cut from ‘Blushing Bride’ cardstock and adhere to your banner with ‘Multipurpose Liquid Glue’.
Finish your card front by adding ‘Rhinestone Basic Jewels’.

Creating your inside
For your inside, cut a piece of ‘Basic White’ cardstock, measuring 20cm x 13.9cm. Score at 10cm on the 20cm edge. On the reverse, measure and mark at 7cm and 13cm on the 20cm. Draw faint lines top to bottom. Measure and mark along the lines at 3cm and 6cm, from the bottom. Cut between the two 3cm marks and the two 6cm marks. Score between your two cuts along the vertical lines. This will give you your pop up box.

Die-cut several large and small hearts from your DSP and fussy cut two sweets. Again you could use lollipops if preferred. Cover your pop up in dsp, measuring 6cm x 3cm. Cut strips of ‘Window Sheet’ to 5cm x 5mm, these will hold your images in your pop up box. Using ‘Mini Glue Dots’, adhere your hearts to the top of your ‘Window Sheet’ strips and the bottoms inside your pop up box. Place some to the back and some to the front, at different heights.
Finish your inside by adding a heart and a couple of sweets to the front of your box and a stamped heart in ‘Real Red’ ink.
All products used are listed below and available to purchase from my online shop.
I do hope you liked my project. For lots more inspiration please continue to hop round the links below.
- JOINING OFFER– Stampin’ Up! Starter Kit, pay £95 and receive a £125 coupon code to spend on your favourite products! PLUS, you will also receive a Get Started Bundle —not to mention all the fun that comes with being part of Stampin’ Up! Plus, enjoy discount on future purchases, and have lots of fun with new friends.
- Grab a bargain at the LAST CHANCE PRODUCTS – Up to 60% off normal prices, while stocks last.
- Visit my ONLINE STAMPIN’ UP! SHOP to browse all the various products on offer, including Online Exclusives and Kits Collection.
- Why not follow me on Facebook for lots of crafty inspiration and weekly lives – Leighsa’s Loft.
")
 Designer Series Paper")


Such a fun card, fabulous on the outside as well as the inside. Thanks for sharing
Thank you x
I love the surprise inside!
Thank you x
Leighsa – I love the pop out box inside the card! Thanks for sharing!
Thank you x
That little pop out is adorable. What a nice surprise when the card is opened.
Thank you x
ooooh, cute cute cute!! Love this Leighsa!
Hi Leighsa, I love the story behind your creation, you are so inspiring!
Thank you x